Thrifty Crafter: May Day Baskets
May Day has many different claims on the origin of the holiday. Some say it sprouted from the Socialists' protests on working hours which occurred in 1886. Others point farther back to Roman times celebrating Flora, the goddess of flowers. No matter which origins you cling you (or none at all), this can be a joyful spring holiday. For a more complete history check out The Incomplete, True, Authentic, and Wonderful History of May Day (Spectre) By Peter Linebaugh. One tradition that has passed through the ages is the giving of May Baskets.
May baskets can be made out of just about anything nowadays and contain a small gift whether it be flowers, trinkets, or candies. These baskets are to be left at a person's doorstep anonymously. The giver drops the basket off, rings the door bell, and runs away. If they are caught, tradition says they are supposed to kiss the receiver. I don't think many people follow the running/kissing part of this tradition anymore, but the baskets can be a fun way to brighter someone's day.
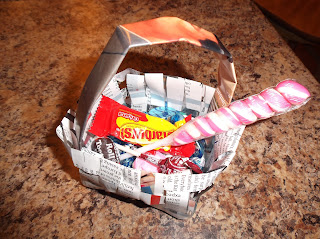
You can always pick up a plastic or wicker basket at the store, along with your treats, but what fun is that? Not to mention the cost of buying baskets for all your friends (or coworkers, or kids playmates). Here is a quick tutorial for making recycled woven baskets from paper, old magazines or cardboard.
What you'll need:
Scissors
Ruler
Pencil
Tape
Thin Cardboard or Magazines or Paper (preferably at least 8x11" unless you want a smaller basket)
**If you have a paper cutter, that works great! If not (I don't have one), you'll still be able to make these just fine.


To make your basket studier add a piece of cardboard to the bottom or spray with modge podge to set it in place. You could also try folding the paper to desired width. This would make each piece much thicker.
Want to add a handle?
Use a folded piece of paper or cover a piece of cardboard and staple, glue, or tape your handle on.

Be sure to pick light enough treats to put in your basket if it is made out of paper. If you chose cardboard you will have a little more freedom as you what you want to fill it with.
Unsure of what to give in a May Day Basket?
Here are a few ideas:
Paper flowers or Real flowers
Candy
Flower Seeds
Cookies
Candles
Chapstick
Whatever you think would be a nice treat to receive!
For an even more nontraditional "basket" check out these ideas:
Food Containers/Boxes:
http://www.marthastewart.com/913713/may-day-baskets
Plastic Cups:
http://www.designmom.com/2012/04/diy-may-day-baskets/
Soup Cans:
http://alphamom.com/family-fun/holidays/make-your-own-may-day-basket/
May baskets can be made out of just about anything nowadays and contain a small gift whether it be flowers, trinkets, or candies. These baskets are to be left at a person's doorstep anonymously. The giver drops the basket off, rings the door bell, and runs away. If they are caught, tradition says they are supposed to kiss the receiver. I don't think many people follow the running/kissing part of this tradition anymore, but the baskets can be a fun way to brighter someone's day.
You can always pick up a plastic or wicker basket at the store, along with your treats, but what fun is that? Not to mention the cost of buying baskets for all your friends (or coworkers, or kids playmates). Here is a quick tutorial for making recycled woven baskets from paper, old magazines or cardboard.

What you'll need:
Scissors
Ruler
Pencil
Tape
Thin Cardboard or Magazines or Paper (preferably at least 8x11" unless you want a smaller basket)
**If you have a paper cutter, that works great! If not (I don't have one), you'll still be able to make these just fine.

Step 1) Using your ruler and pencil, mark each 1/2" along the shorter side of your paper.
*If you want a narrower weave, drop down to 1/4" spacing. Wider weave, use up to 1" spacing.

Step 2) Cut your paper. If you have a paper cutter this can save you some time. Otherwise try to cut in a straight line to create a neater finish to your basket. You should end up with 16 strips of paper per page you cut.


Step 3) Lay out the strips to the desired width of basket.
*Taping the paper strips to the table or cutting board can make the weaving process easier.
Step 4) For a square basket use the same number of strips in both directions. Weave the 2 sets together.
Step 5) When you have reached the desired bottom square area, fold up the edges of all the strips of paper.

Step 6) Begin weaving a new strip of paper through the vertical pieces that you just bent. Use tape to connect new pieces in a row if you run out of length.
Step 7) Continue weaving starting opposite to the last weave completed (either over or under the vertical pieces). When you have reached the desired height of your basket move on to Step 8.
Step 8) Cut the vertical pieces so only 1 inch sticks out. Fold over and weave into basket. May secure with tape.

To make your basket studier add a piece of cardboard to the bottom or spray with modge podge to set it in place. You could also try folding the paper to desired width. This would make each piece much thicker.
Want to add a handle?
Use a folded piece of paper or cover a piece of cardboard and staple, glue, or tape your handle on.

Be sure to pick light enough treats to put in your basket if it is made out of paper. If you chose cardboard you will have a little more freedom as you what you want to fill it with.
Unsure of what to give in a May Day Basket?
Here are a few ideas:
Paper flowers or Real flowers
Candy
Flower Seeds
Cookies
Candles
Chapstick
Whatever you think would be a nice treat to receive!
For an even more nontraditional "basket" check out these ideas:
Food Containers/Boxes:
http://www.marthastewart.com/913713/may-day-baskets
Plastic Cups:
http://www.designmom.com/2012/04/diy-may-day-baskets/
Soup Cans:
http://alphamom.com/family-fun/holidays/make-your-own-may-day-basket/


Comments
Post a Comment