Posts

Showing posts with the label Thrifty Crafter

Yarn Ball Piñata Tutorial - DIY - How to Make a Pinata

Image
Today we finish up our Cat Party series. We've already made a kitty litter cake and a black cat cheese ball, but to finish it out we are making a yarn ball piñata. I mean it's not a party until you have a pinata right? This fairly easy paper mache craft is an affordable alternative to store bought and can be a fun DIY project. Let's jump in! How to make a pinata? What you'll need Newspapers or magazines - cut to 1/2 strips Balloon or bowl (balloons are easier) Flour (or elmers glue ) Water String Yarn Cut newspaper or old magazines into 1" strips. Thicker magazines don't work as well. I would recommend either newspaper or thinner magazine pages (skip the covers for better workability).  Begin by inflating a balloon, or by choosing the bowl you plan to use. If using a bowl, cover with saran wrap to allow for easy removal.   Mix flour paste. Combine water and flour to get a gravy-like texture or think pudding before it sets. Elmer's glue can be used in plac...

How to Crochet - Beginner Basics - Single Crochet (Sc)

Image
So you want to crochet? You'll need to learn how to complete the single crochet stitch for starters. After the chain stitch, it is the most common stitch in crochet projects. It is typically abbreviated as sc followed the the number of stitches. For example, sc 10 would mean single crochet 10. Once you've mastered this stitch, you can complete a simple washcloth or blanket. In the video below, I will show you how to complete the single crochet before continuing on to demonstrate how to complete a cotton washcloth. Practice with me to complete your first project! What You'll Need: Yarn - Cotton Crochet Hook - Size F VIDEO Start by forming a slip knot . Ch- 31.  Insert hook into second chain from hook. Yarn over and pull through. You will now have 2 loops on your hook. Yarn over, pull through both loops. You have now completed your first single crochet (sc). SC in next 29 ch stitches for a total of 30 stitches.  Ch-1, turn work. Sc- 30. Re...

Leaf Bowl - DIY Fall Crafts Tutorial

Image
Happy Fall!! The leaves are changing colors and it's time for the house to change decor as well. This can be an expensive change over if you buy decorations from the store. Luckily there are wonderful crafts you can make at home. Today we are making a leaf bowl. This was a very neat item to make and would be even more enjoyable during a craft night or perhaps creating this with the kids. It's just messy enough to be fun for everyone, but clean enough to prevent the post craft mess hangover. It doesn't take much time and the best part is that it is nearly free to make.  What You Need Plastic Wrap Rubber Cement , Mod Podge , or Elmer's Glue  Leaves - Real or Fake (we used real) Bowl or Balloon Stand to place bowl - we used a water bottle - another option is a paper towel roll Step 1  Wrap bowl in plastic wrap and place on stand. Step 2  Begin applying rubber cement to leaves by painting a thin layer on one side of the leaf. Paint the ...

Easy Crochet Soap Saver

Image
We love using bar soap at our house, but it's slippery and prone to flying out of my hands and the last little bits are hardly ever usable. Solution? SOAP SAVERS!! These things are amazing at making your soap last longer as they allow soap to dry in between uses and can hold even the smallest of scraps meaning no soap goes to waste. Plus, these puppies are super easy to make, even if you haven't mastered the art of crochet. Talk about a win! What You'll Need Crochet Hook E (3.5mm) Cotton Yarn * Scissors *You can choose whichever yarn you prefer. Cotton washes and dries well and is gentle on skin. Wool is also a good choice for being antimicrobial, but may not be a good choice for those with sensitive skin. Crochet Level: Beginner Finished Size: 2.5" x 4" Start: Chain 8 R1: ch-2, hdc in third chain from hook, continue hdc across all loops and around the opposite side for a total of 16 hdc. Sl st to connect to beginning. R2-11: repeat ch-2, hdc 1...

Recycled Paper Boxes

Image
We still have a pile of old magazines to use up and the mayday baskets didn't even cause a dent in the pile so we are making more paper crafts. These cute little boxes are great for gift boxes or storing your knick-knacks. What you'll need: Scissors Paper (magazines or construction paper) Optional: tape or glue Step 1:  If you don't' have a square piece a paper, create a square piece by lining up the corner and creasing it. Cut the edge off.  Step 2: Fold over the other diagonal.  Step 3: Fold all four corner points into center.  Step 4: Fold corner point over to edge line. Repeat for all sides.  The fold lines should look like the below picture so far. Step 5: Fold corner points down to first crease line.  Step 6: Cut along two sides leaving the center box. Step 7: Fold corner to center.  Step 8: Fold edge over and flaps in.  Step 9: Repeat on th...

Thrifty Crafter: May Day Baskets

Image
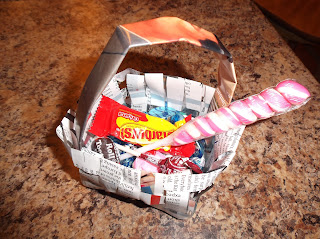
May Day has many different claims on the origin of the holiday. Some say it sprouted from the Socialists' protests on working hours which occurred in 1886. Others point farther back to Roman times celebrating Flora, the goddess of flowers. No matter which origins you cling you (or none at all), this can be a joyful spring holiday. For a more complete history check out The Incomplete, True, Authentic, and Wonderful History of May Day (Spectre) By Peter Linebaugh. One tradition that has passed through the ages is the giving of May Baskets. May baskets can be made out of just about anything nowadays and contain a small gift whether it be flowers, trinkets, or candies. These baskets are to be left at a person's doorstep anonymously. The giver drops the basket off, rings the door bell, and runs away. If they are caught, tradition says they are supposed to kiss the receiver. I don't think many people follow the running/kissing part of this tradition anymore, ...

How to Crochet - Beginner Basics - Chain Stitch (ch)

Image
So you want to crochet? You'll need to learn how to complete the chain stitch to start out. It is the foundation of your crochet projects. It is typically abbreviated as ch or chs followed by the number of stitches. For example ch 10 would be chain ten. What you need to crochet: Yarn Crochet Hook Start by forming a slip knot. Click the link to see our previous post on how to create a slipknot along with a video. Place your crochet hook inside the slipknot. Tips on holding the yarn: Hold the slipknot in left hand and use your left thumb to hold the tail of the yarn. Tips of holding the crochet hook: Hold the crochet hook in your right hand. Your thumb and index finger should be on the flat part of the crochet hook with the rest of your fingers curled around the handle. Crochet hook should be facing upwards. Slide the hook between yarn and left hand index finger. Grab the yarn (or yarn over) with the crochet hook. Pull the yarn dow...

How to Crochet - Beginner Basics - Slipknot

Image
There are so many projects that you can make once you know how to crochet. Which is why we're going to begin at the beginning so you can follow our patterns in the future with ease. Different patterns use different stitches, hooks, and yarns. We're going to begin by showing you stitches. Patterns usually indicate hook size and yarn type. It is easiest to buy a set of hooks so you have all available. Amazon has a great selection to choose from. What you need to get started: Crochet Hook Yarn Once you have your slipknot you can progress to our next post How to Crochet - Beginner Basics - Chain Stitch (CH or chs)

Thrifty Crafter: Natural Egg Dyes

Image
Spring has sprung and Easter is around the corner! Such a fun time, filled with bright colors, candy, family, and more. It can also be a scary food time -- candy filled with corn syrup and other artificial ingredients, eggs dyed with petroleum products, and thousands of empty calories to name a few issues. I can't stop you from overindulging on your ham dinner, but I can help out reducing some of the artificial ingredients you're putting at your table this year. Colored Easter eggs have long been a staple at Easter time, whether you hide them for a Easter Egg hunt or put them out as decoration. Coloring Easter eggs is also just plain fun! That is until you start looking at what is in that dye you are using. Yellow 5, Red 40, blue 2.... Does that sound like something your body can digest well? If you dig a bit deeper you find that these colors are actually petroleum based and are known carcinogens. Yet we use these on food we are feeding our families. This year you can ...

Thrifty Crafter: Shamrock Headband

Image
Whether it is St. Patrick's Day or you just need come luck, wear this 4 leaf clover headband and it's sure to come. This easy crochet pattern can be completed in less than an hour so no excuses not to wear green this year! If you're not so much into headbands, feel free to use just the shamrock as a pin or make a bunch and string together for a scarf or garland. Materials Needed: Worsted Weight Yarn Crochet Hook G Pattern: Round1:  ch-4, join with slipstitch. ch-9, join to center with slipstitch, ch-9, join to center with slipstitch, ch-9, join to center with slipstitch, ch-9, join to center with slipstitch, ch-12, turn, skip first stitch, slipstitch next 10 Round 2: Continuing along your first round of ch-9, Complete the following stitches in the center of your round, not within the existing chains: sc, hdc, 5 dc, 2 tc, dc, hdc, sc, hdc, dc, 2 tc, 5 dc, hdc, sc. Slipstitch to center of ring, Repeat for the next 3 ch-9 sets, ...

DIY Sugar Wax

Image
Besides being annoying, hair removal can get expensive. If you're currently shaving your legs, you could be saving money by switching to waxing. A cheap disposable razor starts around $1 and these usually only last a few uses. I know I switch mine every two weeks or so. This puts shaving at a minimum cost of $26/year, not to mention if you buy nicer razors, use shaving cream, or the cost of all that time you spend shaving. One article that breaks down the cost further can be found at Confessions of the Professions . I know what you're thinking, that buying those waxing kits or making trips to the beauty parlor for your monthly waxing adds up fast too. That is 100% true and that's why you shouldn't be doing either of those. I can't justify spending $50-$80 to get my legs waxed by a professional, nor can I make myself spend the money to buy the kits which start around $10 for the cheap ones. The solution is to do it all at home. You can make your own sugar wa...